Category Archives: projects

Lithium Battery System Install on our Sailboat

Our sailboat (Jeanneau 43DS) has been lithium powered for 10 months now – with a full 6 month cruising season in BC and Alaska mostly off grid (at anchor). It’s been a game changer not having to worry anymore about running out of power or shortening the life of the batteries by running them down to 20% or 10%. 

Lithium batteries are a big subject that I can’t address fully here, so definitely read up elsewhere to learn! This post is just to share our particular setup, since we’ve had a few people ask. I’m not an expert or an ABYC electrician, but I have read marine electrical books, ABYC guidelines, numerous online sites, and have marine electrical experience on previous DIY projects.

It’s not necessary to do everything we did just to get lithium batteries. My goal here was a ground-up complete modernization of our boat’s electrical system. Since this was a new-to-us boat and many of the electrical components were old, this made sense. Many owners replace only one part at a time (ex, batteries, shore charger, etc) but then you get a mish-mash of old and new systems. 

Lithium batteries install overview

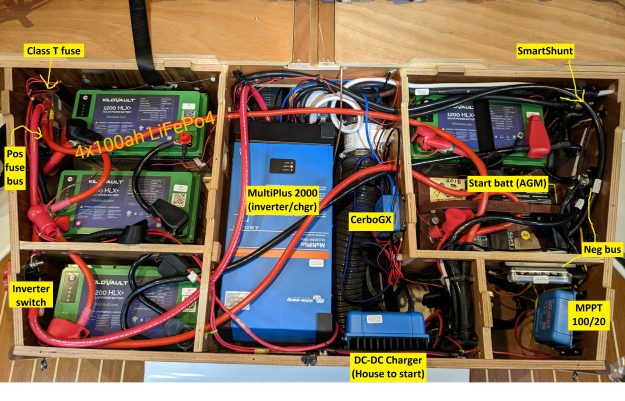
The “heart” of our system is under the aft berth. It’s a tight space to work in, and there were a few other options, but for a few reasons I packed much of it into here.

Continue reading

Installing a WeBoost Cellular Booster on a Sailboat

In a previous post back in August I talked about how we added a cellular router to our boat and hinted we’d probably be doing more soon. Now we’re doing the next logical step which is to add a cellular booster. While a decent external router / antenna does the job in anchorages where we have okay cell tower reception, a booster does the job in places where we have a very weak signal or barely usable speeds.

There are very few anchorages like that in the San Juans, but there are some in BC and Alaska. It’s worth noting previous excellent writing has been done on this at Seabits.com. I’ll be focusing more on the latest install details plus logistics of where to actually buy this thing from.

First, what is a booster? In simple terms it’s a device that enhances your cellular signal. Before I knew anything about boosters I had a few misconceptions – so you should know: you don’t have to plug your device (phone, router) into the booster and you don’t need a SIM card for it. It doesn’t run on any particular cellular service and the best way to think of it is as a miniature cell tower repeater in your boat. You’re installing an outside antenna to pick up a weak cell tower signal and amplify it through a second antenna inside your boat for a slightly stronger signal.

Hardware

The WeBoost seems to be the leading player in the cellular booster market for boats, RVs and probably more. The WeBoost Drive Reach is their latest model and what you want – but from there it gets confusing with many variants of this package and many different distributors you can buy it from.

The Drive Reach is the booster itself – the red finned component plus some basic accessories – and the manufacturer packages it with components targeted at cars, trucks, RVs, or land homes – but not boats. They don’t make a marine package, but some of their distributors do bundle it with marine antennas. Different variants of this product name (“Drive Reach Extreme Marine”) are simply marketing terms for packages of additional accessories sold with the Drive Reach. The “marine” ones generally come with an outdoor marine antenna.

Main Product:

Recommended:

Additional items that vary depending on how you’re installing it:

  • Antenna rail mount (if you’re mounting it on 1″ rail tubing)
  • WeBoost mounting bracket (further comments on this later)
  • Blue Sea 1001 Cable Clam (to run the antenna cable through the deck)
    While there are various types / brands of cable clams, this is my favorite for this situation because you can pass the cable terminator through without having to cut it or reconnect coax terminators.

Continue reading

Rerig Part 5: Replacing the Lower Spreaders

When I finished our rerig two and a half years ago (Parts 1, 2, 3, 4, Summary), it wasn’t supposed to have a part 5. But such is the way with boats. Anytime you think you’re done with something, something new eventually pops up.

In this case it was our lower spreaders – on a routine inspection last summer on the west coast of Vancouver Island I noticed the corrosion on our port spreader seemed to have accelerated. It didn’t look life threatening, but certainly didn’t look good.

Continue reading

How To: Replace Frameless Acrylic Windows on a Boat with the VHB Tape Method

Now nearing five years into owning our 1984 C&C, we’re finally getting around to replacing the badly weathered acrylic cabin windows. Our windows weren’t leaking (much) – a common reason to replace fixed ports, but were old enough that they were badly crazed and more translucent than transparent. We have frameless windows, also known as surface mounted portlights.

Acrylic plastic doesn’t last forever, and some say as little as 6-10 years is all it takes before you start getting UV damage in the form of spiderwebbing lines (crazing). Since we live aboard, having windows we can see clearly out of is a big livability improvement. How many people can honestly say they live in a home without transparent windows? Most houses have glass, which doesn’t craze like plastic does.

We try to avoid working on cosmetic projects (although this is more than cosmetic, since it allows us to see better), but now that we’ve finished 3 years worth of higher priority refit items (like the rig, rudder, etc), we have the luxury of spending some time on lower priority things. And this is a good one for our current cruising phase because it’s relatively low cost but high in time requirements. And we had lots of time available this past November / December.

New window to right, old one to left (note: the streaking on the old one is because I washed it with a dirty sponge)

Many C&C owners have done this project already, and my methods were for the most part simply copying what others have already done. There’s nothing incredibly hard here, but the details matter. If you rush this job, it’s likely to have a poor result in the end.

Continue reading

Technical Series: DIY Install of a Below-decks Autopilot in a Tight Space (C&C Landfall 38), Part 3 of 3

That sinking feeling you get when you know something is probably wrong but don’t want to admit it yet hit me as I peered into the stern compartment at the autopilot shelf. We were at anchor in Friday Harbor, and I was doing a routine inspection of our new autopilot system now that we had put it through some rigorous testing.

Sometimes with boats there’s a temptation to stick your head in the sand and ignore possible problems, or not proactively inspect things because you’re afraid of finding a problem. Ignorance is bliss as they say. But this is something I always try to avoid. Ignoring a problem doesn’t make it go away, and with boats it usually will come back to bite you.

On this inspection of our fiberglassed plywood autopilot shelf I saw a small chip or crack in the top layer of ply, which hadn’t been there before. There was no indication the shelf had moved, but it certainly warranted further inspection. For a few hours I agonized over what it would mean if the shelf were failing. I had put a ton of work into researching and installing the autopilot system the best way I knew how, and yet somehow all that due diligence still wasn’t good enough. If this were a real issue it’d mean I’d failed at one of the most important parts of the project.

I knew if I had to rip the shelf out and rebuild it, it’d be undoing the work already done and doing double that to grind it out and build a new, stronger one. But it’s the right thing to do. The autopilot drive puts up to 650 pounds of thrust on this attachment point, and we want to make sure it’s something we can have complete confidence in.

[This is part 3 in a three part series. You can read more about the autopilot install in part 1 and part 2.]

Continue reading

Technical Series: DIY Install of a Below-decks Autopilot in a Tight Space (C&C Landfall 38), Part 2 of 3

In part 1 I wrote about some of the planning and decision making process that went into researching an autopilot system for our boat. In this part we’ll get into the technical details of installing a tiller arm and autopilot drive shelf.

The most difficult part of the job, and one that is custom to every boat, was figuring out how to attach a below-decks autopilot drive to the rudder post. Our boat, a C&C Landfall 38, has a pinched stern and very limited space around the Edson radial drive. The autopilot drive is a surprisingly large piece of equipment – about 3 feet long at full extension, and the motor housing is about 8” tall by 9” long.

The attachment of the end of the ram to the steering system is very important because the drive can exert strong forces on the system (650 lbs of peak thrust with the Type 1 unit). The proper way to attach to the rudder shaft is a tiller arm – typically about a 10” long piece of cast bronze that is clamped around the rudder shaft, above or below the radial drive or quadrant. Edson and PYI’s Jefa manufacture them, as well as Buck-Algonquin.

The only problem was our Edson radial drive was already using up nearly all the vertical space available on our rudder stock – of about 4.5”, it uses up 3.75” (the concave disc model). Standard tiller arms are a minimum of 1.75” in height, too large to fit in 1.25” of space.

I looked at all the available tiller arms, measuring and re-measuring, but none of them would fit. Next I considered more drastic options like whether I could move the radial drive up or down to make more space (I couldn’t), and options like flipping the radial drive or buying a new one with a slimmer profile. I talked to people at both Edson and Jefa and both were very helpful, but ultimately this was a very difficult problem – the C&C Landfall 38 simply was designed with a very confined rudder shaft space.

A slimmer Edson radial drive or a Jefa drive with integrated tiller arm might have worked, but would add a substantial amount of work to the project. A radial drive swap isn’t trivial, and each option also would’ve changed the height of the steering cable track, which would require re-engineering the idler shivs to be at an appropriate angle / height (otherwise the steering cable will chafe).

Continue reading

Technical Series: DIY Install of a Below-decks Autopilot in a Tight Space (C&C Landfall 38), Part 1 of 3

The decision to add a below-decks autopilot to our boat wasn’t an easy one. For one, it’s expensive, and also a very difficult, time-consuming install. Furthermore, we already have a wheel-mounted autopilot. Why on earth do we need a different one? Then there’s the eternal debate between windvanes vs electric autopilots.

The answer to why we needed a below-decks autopilot is an easy one – our Raymarine ST4000+ wheel pilot simply can’t handle our boat in strong wave conditions, running with a following sea. And that’s the main job we need an autopilot for. The wheel pilot is rated for vessels up to 16,500 lbs, and ours is 17,000 lbs when empty. Loaded with cruising gear it’s likely 19,000-20,000 lbs.

The new autopilot system – Raymarine EV-200

Probably the biggest thing motivating a below-decks autopilot is the memory of our Hecate Strait crossing last June in a gale. I hand steered for almost 18 hours in big, breaking, following seas because the wheel autopilot couldn’t handle it. But there have been plenty of other times where it would’ve been nice to have an autopilot I could have confidence in.

Hecate wave state before it got hard. These were the “easy” waves.

Continue reading

Boats, Aka Infinite Work Machines

It never ceases to amaze how a boat is a Pandora’s box of unending projects. As soon as you start working on your list, five new issues pop up to make the list longer and replace the ones you finished. A boat is like a perpetual work machine – you’ll never run out of things to do!

In many ways I like this, because it delivers a great feeling of satisfaction to be getting things done and improving our home. At times it’s frustrating though, like when everything seems to be breaking at once (our canvas is getting holes, our hot water heater sprung a leak, our hygrometer broke, and our electric space heater is getting rusted / flakey).

As mentioned in the last post, March is project month. We got back to our boat on the hard in Everett on February 27, and were elated to discover nothing terrible had happened in the 5 months we left her. No rodents or bugs had moved in and we didn’t have a boat full of mold!

Continue reading

Winterizing a Boat in the Pacific Northwest

Surprisingly few large boats are winterized on the hard in the Pacific Northwest, as is standard practice in other areas where the water freezes (New England, the Great Lakes). We have the luxury of not having to; the relatively steady ~50 F water temperature prevents engines from freezing or harbors icing over. And we have the option of year-round sailing – although much of the winter is pretty rainy and dark, we always have some stretches of sunny, 45-55F weather (positively balmy!).

Yet there are some advantages to storing your boat on land (“on the hard”) – less bottom paint wear, no dock line chafe, etc. So this year we went this route, given we’re traveling for the winter and won’t be able to use our boat. Debating the pros/cons of storing in the water vs on the hard, it was hard to find much information specific to the PNW.

Even though many boats never leave the dock in the winter, their owners still choose to leave them in the water, paying significantly higher moorage costs. This is perplexing, but I guess it boils down to convenience – it takes a bit of work to winterize a boat, and there isn’t a huge surplus of winter storage yards in the Seattle area.

Perhaps another deterrent is that most storage yards have a couple neglected, derelict boats that have been there for years. In some cases, yards are where boats go to die – and this can be very hard to see (not to mention the concerns over their boat catching on fire next to yours). Leaving our boat is a scary thing because not only have we put thousands of hours of work into it, it’s our home now too.

At the end of September we spent several days working to prepare our boat for storage on the hard. There are many articles on winterization (SailriteWest Marine, Discover Boating), but I’ll cover some things we learned that weren’t mentioned elsewhere, and the checklists we used so we wouldn’t forget things.

Continue reading

Non-skid Paint: What Worked for Us

A year ago we wrote about our experiences with KiwiGrip non-skid paint and how we were pretty unhappy with it because the sharp ridges trap dirt very tenaciously, making the paint appear  permanently dirty, even after cleaning.

For our next non-skid experiment, we had a few ideas of other kinds to try. Finally a year later, we took advantage of some sunny days in March and tried out Interlux Brightside + Interlux non-skid additive (called Intergrip).

Happily, this non-skid looks much better than KiwiGrip and isn’t really even harder to apply. It seems we’ve found the right non-skid for our personal preferences. Of course, we still need to wait a few years to see if it’ll hold up to the test of time / use. But all the reviews indicate it will (we steered clear of Interlux Interdeck, a premixed kind of non-skid, due to reviews saying it doesn’t hold up as long).

Continue reading