
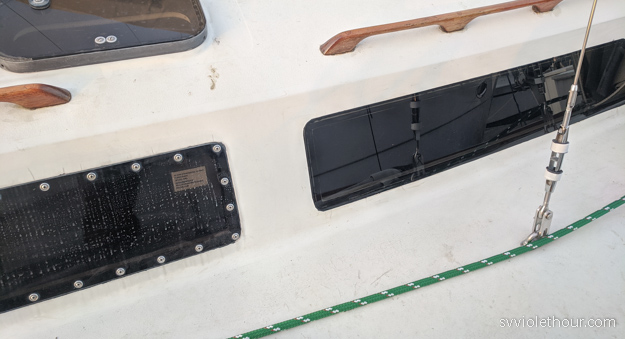
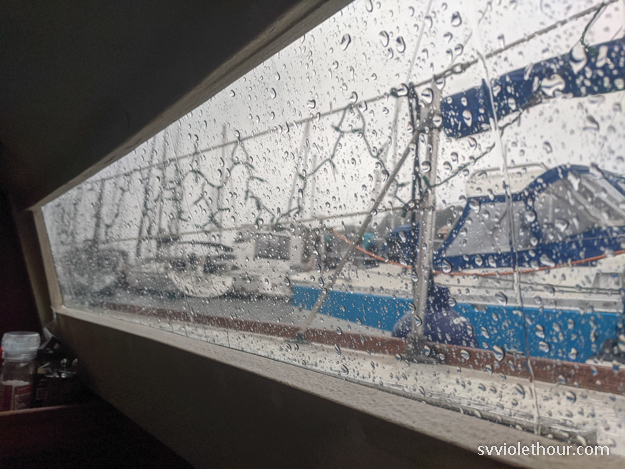
Now nearing five years into owning our 1984 C&C, we’re finally getting around to replacing the badly weathered acrylic cabin windows. Our windows weren’t leaking (much) – a common reason to replace fixed ports, but were old enough that they were badly crazed and more translucent than transparent. We have frameless windows, also known as surface mounted portlights.
Acrylic plastic doesn’t last forever, and some say as little as 6-10 years is all it takes before you start getting UV damage in the form of spiderwebbing lines (crazing). Since we live aboard, having windows we can see clearly out of is a big livability improvement. How many people can honestly say they live in a home without transparent windows? Most houses have glass, which doesn’t craze like plastic does.
We try to avoid working on cosmetic projects (although this is more than cosmetic, since it allows us to see better), but now that we’ve finished 3 years worth of higher priority refit items (like the rig, rudder, etc), we have the luxury of spending some time on lower priority things. And this is a good one for our current cruising phase because it’s relatively low cost but high in time requirements. And we had lots of time available this past November / December.
New window to right, old one to left (note: the streaking on the old one is because I washed it with a dirty sponge)
Many C&C owners have done this project already, and my methods were for the most part simply copying what others have already done. There’s nothing incredibly hard here, but the details matter. If you rush this job, it’s likely to have a poor result in the end.
Method
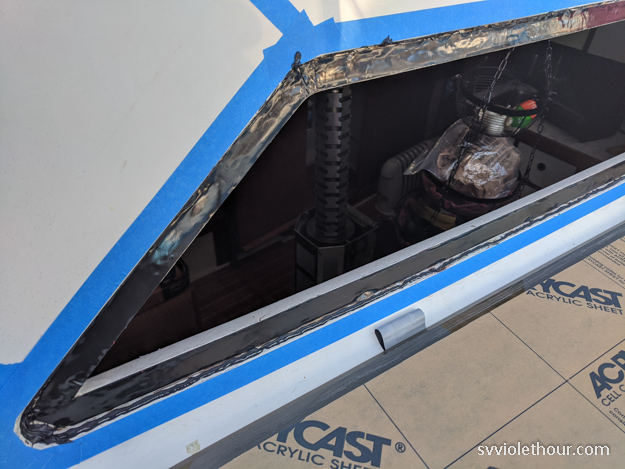
Our existing windows were thru-bolted and sealed with some kind of black flexible sealant. For the new windows we switched to a more modern method: the acrylic is adhered to the hull using adhesive 3M VHB tape (VHB stands for Very High Bond) and sealed using Dow Corning 795 industrial silicone.
There are good explanations of this method here:
- The YouTube show Boatworks Today
- CnC List (C&C owners list)
- Sail Magazine: Replacing Fixed Portlights
From what I understand this method is used on many newer production boats such as Beneteau’s. Still, I took me a while to feel comfortable with whether it would be offshore worthy. A window failure at sea can be catastrophic – if you lose a cabin window while waves are breaking over the boat, you might have no easy way to prevent taking on water.
There are some people who will still disagree, but once I understood the VHB properties I was confident it could hold up to offshore stress. VHB tape is used to bond skyscraper windows to buildings. As long as it’s applied correctly, it has very high bonding strength. And the fact that it’s a flexible tape creating a soft mounting surface is actually an important feature.
Thru-bolting acrylic windows makes them weaker – our old windows had cracks around the thru-bolts in several places. Acrylic expands/contracts with temperature changes, and the boat itself flexes slightly when at sea. So a window is more likely to fail due to flexing and cracking than it is to pop out.

Old window with thru-bolting, cracked in bottom corner
Time
This project takes a lot of time, and is not the kind of project to rush or take shortcuts. For us it took at least 40 hours, plus about 10 hours in prep research and communicating with the plastics shop. About 1/4 of the 40 hrs was in filling the 100+ thrubolt holes and chipping off Plexus, which not all boats will have to deal with.
Per Window, approx 8-10 hours:
- 1-2 hrs: Remove ~30 thru-bolts and pry off old acrylic
- 4 hrs: Scrape, sand and prep window frame in hull. Clean with a degreaser (ex, acetone) and then 50/50 isopropyl alcohol (IPA) / water mix.
This included about 1 hr/window for epoxy repairs to damaged gel coat.
- 1 hr: Test fit new window and mask around hull frame with painter’s tape
- 1 hr: Apply VHB tape, test fit again and cut off inner acrylic masking paper where the VHB tape will adhere. Scuff that edge with sandpaper and clean with 50/50 IPA/water. Apply silicone around corner of hull inset, then press in new acrylic.
- 1 hr: Inject and tool silicone into the gap around the new window. Clean-up. Remove acrylic masking paper and marvel at your new view.
Total: 8 hrs/window * 4 windows = 32 hours
Filling and painting ~100 thru-bolt holes: approx 8 hours:
-
- 45 minutes per epoxy round * 2 iterations/window * 4 windows = 6 hrs
- ~2 hrs for painting over epoxy on interior
The epoxying required many iterations because we were doing one window at a time, and because when you inject thickened epoxy into a horizontal hole (a hole in a near-vertical surface), it’s difficult to get the hole completely filled on the first attempt. In some holes it settled and I had to refill on the next round. There may have been better choices for fill material, but epoxy thickened with sandable filler was popular on a few forums I read.
Materials
- 3M VHB 5952 tape in 3/4” width
We used the 5952 VHB tape because it’s a high bond strength designed for these applications and it comes in black (some of the other model #’s are red or gray, which wouldn’t look good under the windows). Some caution is advised picking a supplier. Ebay has cheap VHB tape but is not an official 3M distributor. McMaster Carr, Grainger and others are. 3M informed me Amazon is a 3M distributor. I found a number of complaints on Amazon product reviews, but I believe this may have been for Amazon affiliate stores (if it says “Sold by X” or “Sold by X and fulfilled by Amazon”, that’s *not* an Amazon supplied product).
It sounds like the problem is some suppliers are rerolling the tape – in order to save money and sell shorter lengths of tape, they take the very large rolls from 3M (108+ ft) and unroll, cut and reroll it back onto a spool. A machine does this, but there’s some risk that the tape surface loses adhesive power in the process.
- Dow Corning 795 in black color
This is easier to find. Again some caution is advised because apparently some retailers are selling expired tubes, and this silicone is reportedly sensitive to expiration dates – it may not work correctly if expired. The expiration date is printed on the tube, but sometimes it is rubbed off / worn off. If you get one in that condition I would probably return it.
- Plastic sheeting – we used 3 mil “clear” plastic sheeting to cover the windows while they were out. It literally said clear on the packaging, but the sheeting was not clear at all – more like opaque. It let light in, but we could not see out through it. If you’re living aboard it might be worth finding actually clear plastic sheeting.
Tools
- Paint scrapper – rigid style
- Paint scrapper – flexible style
- Painter’s tape
- Fein MultiTool with 80-180 grit sand paper
- Dremel with sanding drum
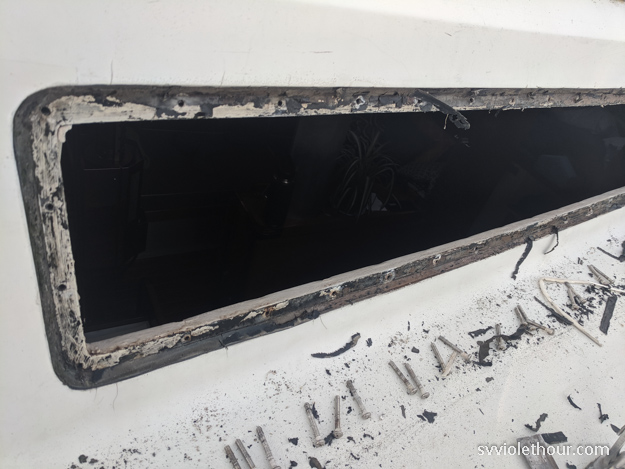
Getting the old windows off wasn’t terribly hard, but cleaning the surface is. First we had to scrape off all the black sealant, and then found a hard, brown epoxy-like material underneath – Plexus, aka methacrylate adhesive (Plexus is the brand name of this structural adhesive). Plexus is evil stuff. It’s quite possibly worse than 5200 in regards to removal. It bonds permanently to the underlying gelcoat or fiberglass. It’s what C&C used originally to bed the windows, and nowadays is no longer a recommended method.

Removing remaining Plexus involved hitting a scraper with a hammer to chip it off, which also pulled off gelcoat at times. You can try sanding it, but it will take a very long time to sand if it has any thickness to it. Luckily, not all of our windows had much Plexus – it appears a former owner already replaced the windows and removed some Plexus.
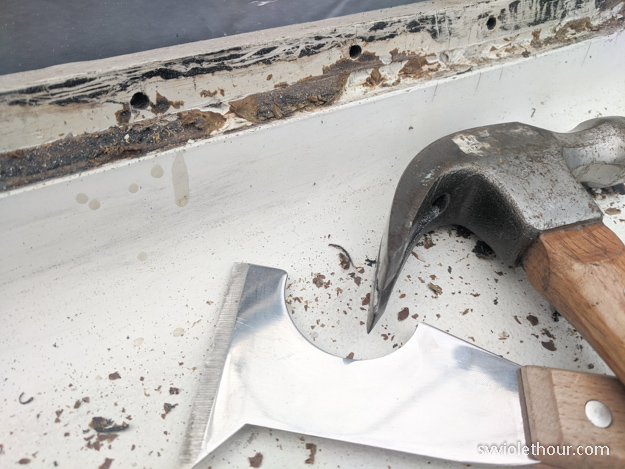
After removing as much Plexus as possible, I sanded using a Fein Multitool with medium grit sanding triangles, and occasionally used my Dremel sanding drum. The Fein is better for getting a flat, smooth surface along the beveled edge. The Dremel can sometimes create diveted / uneven surfaces, since it uses a round sanding drum, so I only used that in small spots where I had stubborn protruding bits of Plexus.
All Windows At Once or One at a Time?
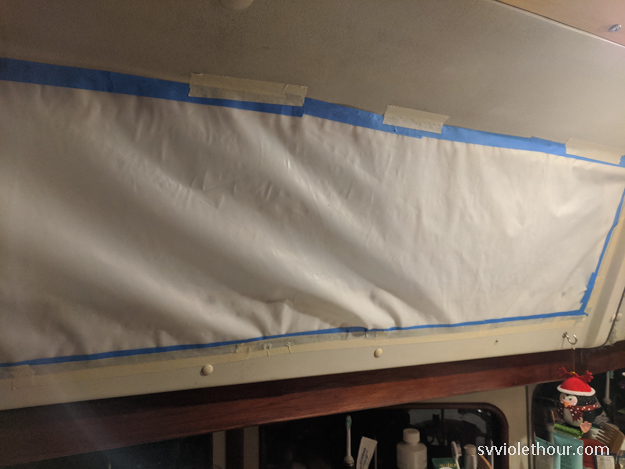
Since we live on our boat, and would be doing this during the cold, rainy Pacific Northwest winter, a big question was whether to do all 4 windows at once or one at a time (or 2 at a time). Most people do them all at once, to make the project go quicker, but most people aren’t doing this while living aboard in the winter.
We were glad we decided to do them in stages (#1, #2, and #3+4 at the same time). It made the project take 4 weeks instead of two, but we realized having all four windows out at once would make life really difficult and unpleasant. After covering the holes with the “clear” 3-mil plastic sheeting, I found the clear sheeting was more opaque than clear. Especially after doubling it up (for better insulation), it was not possible to see through the sheeting. This means less visibility, and having no windows in your cabin in the winter would be really difficult. Seasonal affective disorder is a real risk here in the winter, when daylight hours are short, sun sometimes non-existent, and opportunities to get outside are reduced.
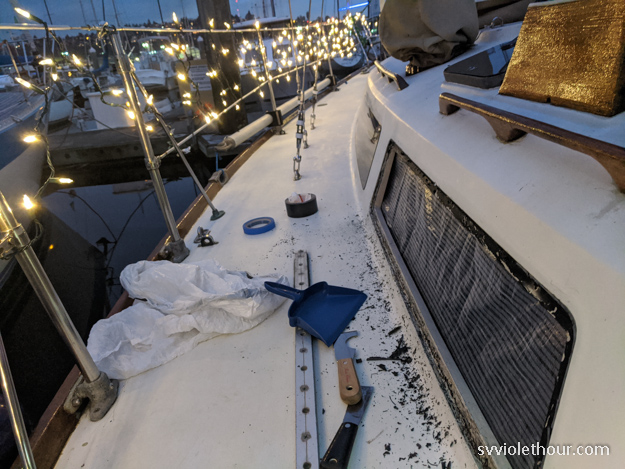
There are two other downsides to having windows out in the winter that we worried about: cold, and rain. These turned out to be not as bad as expected. Covering the window (with the plastic sheeting plus draping a heavy plastic panel from our old full enclosure) reduced heat loss pretty well, and we kept our two electric heaters running to compensate.
And rain never got in through the sheeting – I monitored to make sure the painter’s tape at the top edge and sides was well adhered, and reinforced with duck tape at the corners when adhesion got reduced. Having a Strataglass panel (full enclosure panel) above the window also greatly reduced rain getting on the plastic sheeting.
To Paint the Back Edge of the Acrylic or Not?
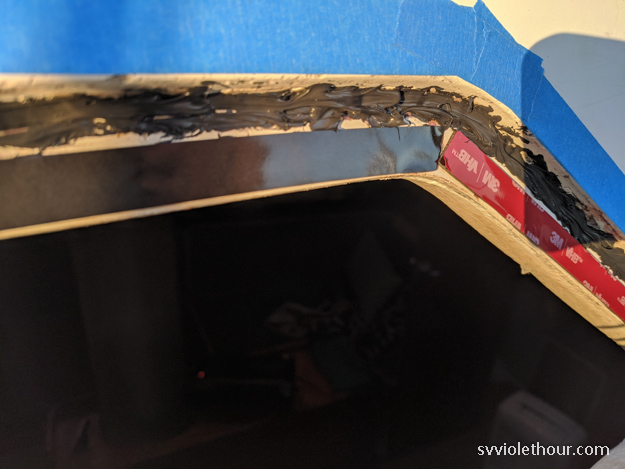
One aspect we did differently from some others online is we didn’t apply black paint to the back edge of the new acrylic, where it overlaps the hull inset. Others recommend this, often with Krylon paint, to ensure that the white hull surface doesn’t show through the tinted acrylic. We figured the black VHB tape would take care of this (and a couple others online did it this way as well).
On the 1st window where we used 1/2” width VHB tape, it didn’t completely cover the white hull. We attempted to fill in the rest with the black 795 sealant, but that was a bit messy and so it doesn’t look perfect. But it’s not too bad. On the next 3 windows we switched to 3/4” VHB tape, which completely covered the visible hull surface and looks great.
1st window inset, with the 1/2″ tape
What’s the Worst Vegetable on a Boat? A Leak!
Stuff going wrong is pretty normal in boating, but usually it’s something going wrong with old equipment, not something brand new we’re putting in. It’s really disheartening to finish a project and find you did something wrong (as with the autopilot mount last year).
So when I found out our brand new window was leaking, I was pretty upset! As a heavy Seattle mist fell in late November (the kind of drippy, foggy rain that isn’t heavy rain but creeps into the tiniest apertures on a boat), a steady drip appeared inside one corner of our 1st new window.
It was very hard to trace the leak, but as far as I can tell it came from one of two possible sources:
- Miniature gaps where the silicone bead had pulled away from the hull or acrylic. These were only a hair’s width thick, but that was probably enough for water to wick in.
- Gel coat cracks along the edge of the hull frame. Our 35 year old boat has plenty of small gel coat cracks around the window ports, caused by hull flexing / normal hull stress. In some cases these hair-width spider lines extend under the silicone sealant and may have been wicking water in.
The 1st window, done with 1/2″ VHB tape
One trick I discovered was using compressed air (the kind you get for cleaning computer keyboards) to push air at the exterior of the sealant joint. When I got to imperfect sealant, even though there might be no visible issue, the air would push through and create bubbles in the water sitting behind the gap. I did this with a headlamp, which facilitates seeing through the tinted acrylic.
I eventually fixed the leak with some reapplications of the Dow Corning 795, but for the next 3 windows we followed more stringent processes.
Tooling the Silicone
From that mistake on the first window, we learned that tooling the silicone requires much greater attention to detail than expected. The sealant around the acrylic needs to be perfect to avoid water seeping through. If the silicone pulls away from the edge – either hull or acrylic – water can wick in through the crack.
So on subsequent windows we did additional prep (filling gel coat cracks with epoxy) and made sure to perfectly tool the silicone into the gap. Dow Corning 795 is pretty forgiving, and we were able to work on it just with a bare finger – no soap or liquid – but you can only run over it once or twice. Repeated attempts to make it neat will likely make it worse. However, if an area wasn’t tooled cleanly in the first pass or two, I found I could apply additional silicone on top of the messy area and then re-tool that.
Conclusion
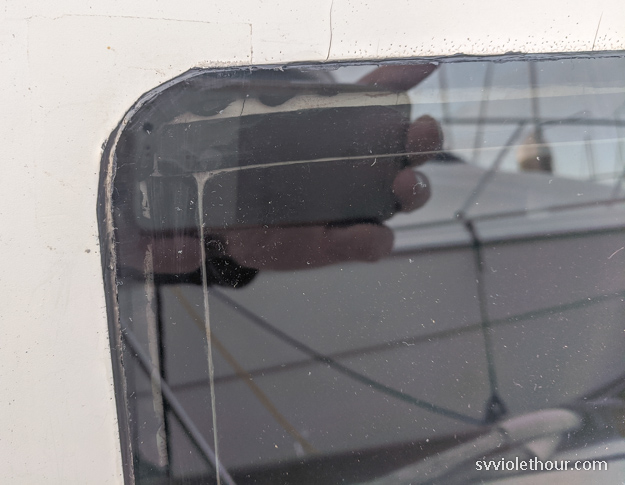
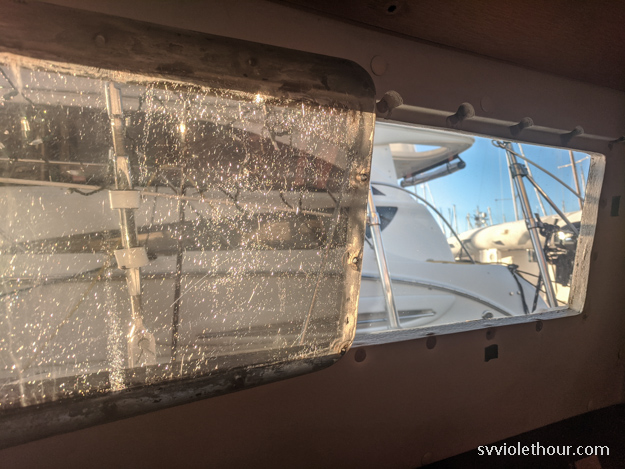
When we pulled the cover paper off our first new window, a stunned look passed over our faces. Natalie and I couldn’t believe the night-and-day difference it made. For years we had been looking through crazed, foggy windows, and the new one was crystal clear.
For comparison, holding the old acrylic in front of the new one
It was almost like the window wasn’t there at all. We could see our neighboring boat in sharp detail, and can only imagine how much better the views are going to be in the beautiful anchorages we visit once we’re back out to full-time cruising (April).
This project took a lot of time, but relatively little money in boat terms, and turned out to be well worth the effort.
[Note: This page contains Amazon links which give us a small referral fee if you make a purchase within 24 hours of clicking the link. We only recommend things we like, and you’re always free to purchase it elsewhere or without the referral link if you wish.]
nice project, where did you get your replacement acrylic windows?
Most plastics shops can cut the acrylic, we used Clear Cut Plastics in Ballard, Seattle.
Thanks for sharing your project, i picked up some great information. Question – what thickness were the acrylic windows – ie” 3/8 or 1/4 inch?
They are 3/8″. Thanks, glad this post has been helping other boaters!
Did you use asolvent for the black sealant that was above the Plexus? What solvent is recommended?
Some people recommend a 1/8 inch gap betwwen the new acrylic and the window frame. Do you also recommend this gap? The 795 fills this gap and allows for expansion. When placing the window into the VHB tape,what did you use for spacers to ensure the acrylic window was properly spaced into the window frame? I am considering a number of double stacked washers appropriatley spaced along the bottom of the frame.
Your blog has been very helpful. Thank you.
We tried some 3M Adhesive Remover I believe and Goo-B-Gone as well as I think alcohol/soapy water mixture and none of them helped a great deal, they just make the sealant softer/wetter which may make it easier to scrape off. But mostly it was a manual scraping job and then finishing touches with a sander (oscillating Fein or Dremel).
I would definitely try for a 1/8 inch gap between acrylic and hull frame dimensions. A couple of our windows didn’t quite have that (maybe only 1/16″) and expansion / flexing caused them to leak a bit after 1 yr. We redid them with a slightly bigger gap (by sanding down the acrylic edges that were tight).
To place onto the VHB tape we test fit and then ran duck tape strips along the bottom edge. Then folded down the window, injected sealant into corners not covered by tape, removed the tape cover and carefully placed the window keeping the duck tape taut (2 person job). The stacked washers idea sounds good.
Thank you very much for your quick reply. Xylene did soften the black material to help in removal but did run and discolor the gelcoat.
In one of the articles you linked to, it recommends 3M 4991 which is 2.3mm thick, not 3M 5952 which is only 1.1mm thick. I just used the 5952 that you recommended and there is almost no gap unfortunately. I’m going to do the other set with the 4991 and hopefully it gets closer to that 1/8 in. We’ll see what happens in a year I guess!
Yes, that’s a good point – I think the tape thickness depends on the boat and how your window insets are designed. On our C&C, the thinner tape was best because otherwise the windows would’ve protruded out from the coach roof.
The gap that was filled with sealant was a gap around the circumference of the acrylic window – so that gap was mostly determined by the width/height the acrylic is cut to, rather than the tape thickness. But I agree some custom tweaking is needed depending on the particular boat.
How’s it holding up? Do you still recommend this window conversion?
Yes, they held up well and I know other people that have used the same technique.
I have a C&C 115 (2006) that requires window replacement as well. The originals were bronze colored Lexan polycarbonate (I think). We do some offshore racing. Question: acrylic or polycarbonate for replacement? I’ve heard pros and cons of both.
I recall reading some debates on acrylic vs polycarbonate/Lexan… each has pros/cons but acrylic is easier to source from local shops I think. Here’s an article I found which discusses it:
http://www.cncphotoalbum.com/doityourself/portlight_replace/page02.htm
Polycarbonate/Lexan is stronger, but strength isn’t really the issue with windows our size. The author saying polycarb/Lexan scratches easier is a big downside for us since it’s already hard avoiding scratches to acrylic.
What color / tint were your new windows? Looks like you used a dark grey?
It was medium gray, “Acyrlite 2064”.
I’ve seen a few videos now, including two from professional shops, showing two variances from your method: Firstly, they said they weren’t just painting the acrylic for visuals but also to protect the 795 from UV exposure (which seems odd as it’s absurdly hardy), and secondly, they applied the tape and sealant to the window rather than the boat itself… seems more like a technique choice.
Thoughts on the UV thing? Have you noted any cracking or shrinkage with the 795?
UV protection might be a good idea (I’ve seen black tape used on other boats, however I don’t know if they used Dow Corning 795 behind that tape). We didn’t have any issues at all with the sealant deteriorating. Dow Corning 795 claims to be “highly resistant to UV” and “virtually unaffected by sunlight, rain, weather.”
I like what you have done. I am planning on replacing the windows on my boat if I break the windows due to removal. My acrylic is in good shape but they used Sikaflex and it has failed in some areas so it could be difficult to get windows out. If you use the VHB tape to leave a 1/8″ gap around the outside of acrylic, can you just fill that gap in after placing windows in place to create seal. Would 1/8 gap be enough to seal window or should I make it 1/4 inch as I have the room.
I think it might be difficult to inject enough sealant into a 1/8″ gap after placing the window on the VHB tape. It can be difficult to position the window precisely and the gap may end up tighter on one side. 1/4″ would make it easier and also give more expansion room (in some cases it’s the sun heating causing expansion which cracks the acrylic and/or breaks sealant seal). It’s a judgment call though, depends on the situation.
3/16 would be better. Fill around with DowSil 795 using a spoon to carefully contour it.
The windows on my yacht are large 40” x 80” and they can grow by as much as 1/2” depending on the temperature range. From my understanding the VHB tape attaches to acrylic and fiberglass. Will the tape have enough give not to detach from either the acrylic or fiberglass due to expansion or contraction of acrylic compared to fiberglass.
Those are very large windows (looks like you have a catamaran) – over 3’x6′ is about twice the size of what I did. So that’s beyond my expertise, you may need to find someone else with similar sized windows that has done this project. The VHB tape is pliable/stretchy and 3M has a technical specs sheet which may say how much expansion it can tolerate. I suspect it would work out but can’t say for sure.
what method did you use to remove the old plexiglass. was heat used?
I don’t recall using heat. That may have been a good idea to soften the sealant. For us paint scrapers and gradual, even leverage was enough.
I saw a 1980 C&C a couple years ago that had custom made frames made to help seal the windows in. It was about a half inch wide, maybe 1/8″ thick, polished and screwed into the hull. Looked great. Not sure of any of the specific design details – actual thickness, screw sizing, was there a gasket… Appeared to be polished stainless steel. Anyone have thoughts on this? Thanks