
From our first days of cruising, photography has been a big part of telling the story of what it’s like to sail in the Pacific Northwest. We sail to spectacularly beautiful places, including areas that few sailors will ever get to, and I feel it’s my duty to share what we see. Photography is the best way I know to communicate what we love about sailing the PNW.
Often we remark that the picture doesn’t do it justice – capturing these natural environments is incredibly difficult. We’re usually on the boat, a moving platform from which it can be hard to capture the perspective we’re seeing (vast open spaces, ourselves surrounded mostly by water). The weather may not cooperate, and wildlife (like whales) appear for mere seconds, often far away.

I (Patrick) do the photography for the blog (which is as much an outlet for my photography hobby as it is for telling the story of our adventures). I’ve been doing photography as a semi-serious hobby for about 15 years, including landscape, travel, nature, macro, portrait, and even a bit of studio practice. But only the last 5 years or so have I been doing photography from a sailboat.
There are a few things that make it particularly tough:
- You’re confined to a 38’ platform (in our case). We don’t have the luxury of a chase boat or a drone. Our mast is about 50’ tall, yet we can only safely stand about 15’ feet away from it. This means a standard length lens only captures a small fraction of the boat.
- The boat is almost always moving, making camera shake and low light photography an issue. A tripod isn’t really useful (perhaps for video).
- The background is often a panoramic vista of mountain ranges hundreds of miles away, the middle-ground is entirely water, and the foreground is the boat, rig and sails. The human eye does a great job of seeing far away objects in conjunction with large nearby objects, but this scale is hard to capture in photos.
- As with landscape photography, often there is no subject to occupy the foreground and demonstrate scale. When possible we try to put one of us in the scene, or a boat part, or get off the boat (in the dinghy or on an island) to make the boat the subject.
Despite these challenges I’ve gradually learned some tricks to deal with them (and acquired lens that are better suited to it). Here’s an overview of the gear I keep on board and how I use it onboard the boat.
Camera Body: Canon Digital Rebel T3i
This is a pretty affordable “prosumer” camera body and does a good job for my purposes. Certainly there are better, more expensive camera bodies out there (it’d be neat to try the mirrorless ones someday!) but I don’t think the camera body is the most important factor for sailing photography. The T3i is now a discontinued model (I bought it 5 years ago – camera technology changes quickly!) – the Rebel T6 is the logical successor now.

Some of the more expensive camera bodies (such as Canon EOS 70D) are weather sealed for better resistance to rain and moisture. A nice feature for a boat, although I haven’t found it to be an issue. I keep the camera clean and dry as much as possible, and avoid getting saltwater spray on it. If I want to photograph in a risky situation (like from our paddleboard), I use a GoPro (more on that later).
This is a crop frame camera, so keep in mind lens focal lengths on this page get multiplied by 1.6 if you want to compare to full frame / 35mm equivalents. Also keep in mind that the EF-S lens only work with crop frame camera bodies (EF lens work with either kind). [Specs]
Lens #1: Canon EF-S 17-85mm IS
This is my go-to, general purpose lens. The focal length range is ideal for 80% of what I photograph, and this is important because you don’t want to have to switch lenses a lot while sailing (it’s cumbersome, and each time you risk dropping a lens or getting saltwater in it).
I’ll commonly be at 17mm for landscape, anchorage and sailing shots. I use the longer focal lengths towards 85mm when I want to get a detail shot for perspective (ex, the bow with mountains in the background), while hiking, or of nearby wildlife (ex, eagles or seals).

64mm, f/10, 1/125s, ISO 125
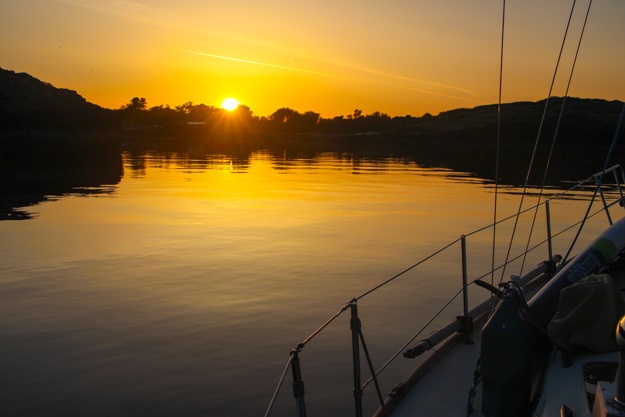
Lens #2: Canon Wide-Angle – EF-S 10-18mm f/4.5-5.6 IS
Natalie bought this lens for me for Christmas in 2017, and it was a huge upgrade to 2018 sailing photography (when we spent 6 months out on the water). The main use for this lens is capturing our boat in the frame while underway. If you try to photograph a 38′ sailboat while you’re on it, with a lens length over 20mm or so, you only get a small portion of the sails, or details like the lifelines and winches.

10mm, f/11, 1/160s, ISO 100
A wide-angle at 10-15mm allows me to capture a good portion of the rig, including both sails, in the foreground, with mountain ranges and water in the background. It puts the viewer in the scene, and allows you to see what it’s like for us on the boat while sailing. Often I also capture the look of the waves or water spray next to our hull by holding the camera a little bit outboard near the toerails or lifelines.
Another reason I like it is it produces photos that are a bit more unique, because few people publish photographs of their boats underway and sailing in the PNW (perhaps because most don’t have a wide-angle lens). I love sailing and therefore love seeing photos of boats sailing. The next best option would be photos captured from off our boat while sailing, but we can’t do that without a drone or chase boat.
Lens #3: Canon 70-200mm telephoto
This big lens is the one I put on for wildlife shots – whales, eagles, bears, sea otters, etc. Usually I end up at 200mm most of the time I’m using this lens. Having a bit longer range (300mm) would be nice, because wildlife are often far away.

200mm, f/4, 1/1000s, ISO 100
Lens #4: Canon 100mm Macro f/2.8
I use the macro lens mainly while hiking when we find an interesting banana slug or flower. Honestly I don’t use this lens a lot, but would like to, because it can produce some unique and beautiful close-ups. The fixed focal length is a limiting factor on the boat though because it’s rare that 100mm works out to be exactly what I need.
Lens #5: Canon 50mm f/1.8
This lens was inexpensive, and actually is partially broken now after I dropped it on the deck. It still works but I didn’t use it much anyway, probably because a fixed focal length is often limiting around a boat. It’s rare that 50mm is exactly the focal length I want, and I can’t easily move the camera to a better vantage point. This lens is good for portrait type shots, especially on shore.
GoPro Hero3:
I use the GoPro mainly when I want to get some underwater shots or shots where the camera is likely to get wet. It’s great for capturing photos of underwater sea life (star fish, anemones, etc). Another strength is its wide angle photos, for shots from the deck when we’re sailing. I used to use it more for this, until I got the Canon wide-angle lens.

The GoPro Hero3 is a fairly old model by now, so if you have the money it could be worth springing for the GoPro Hero7 which has an LCD preview screen on the back. One of the weaknesses of the Hero3 is that I don’t know if I’m getting good shots until I can connect it to a laptop or phone. You can preview your shots via Bluetooth on your phone, but I generally can’t do this in real-time because I use the GoPro in wet, rainy or salty conditions.
Google Pixel Phone
Phone cameras can be surprisingly good these days (even Trey Ratcliff, world famous New Zealand photographer, agrees), and the Pixel has a particularly good one, so I use my phone camera fairly often. It comes in handy when things are too hectic to retrieve the big SLR camera. It also has automatic HDR (high dynamic range) for scenes with large light level contrasts, and can make pretty decent panoramas.
Accessories
- Polarizing filter – this is essential and I keep one on my 17-85mm lens and one on the wide-angle lens all the time. The polarizing filter helps both with contrast and deepening the blue color of the sky, and with improving the look of the water by reducing reflections.
- Neutral Density Graduated filter – a graduated ND filter is a filter that is darker at the top than at the bottom. This allows you to take better photos of scenes that have big light ranges – usually an orange sunset at the top of the frame, with water or trees in the lower half. I don’t use this filter too often, mainly because it has a pretty specific use case and it’s a bit of work to setup.
Note: Links on this page are Amazon affiliate links – if you decide to purchase some gear (and do so within 24 hours of clicking the link), we’ll get a small percentage to help support the blog. The price to you is the same. Thanks for reading and I hope some of this was helpful!
Hi, I found this a really interesting post as we have embarked on our liveaboard adventures and like you, I am a keen amateur photographer. We use a gopro7, djr spark drone, Samsung 8 phones and a Canon EOS 80D with a 18-135mm STM lens. Love looking at your shots.
Nice description of each of your tools Patrick. I empathize with the challenge of scale. Boats are pretty useful. Let me know if you figure out how to get a picture that really describes the sea state. No matter how it feels in person, it always looks so small on film!
It would be nice to see a post about reference books/cruising guides you keep aboard too.
Boats. It’s amazing how many different things are made more “interesting” by boats. 🙂 I have hundreds and hundreds of pictures of my boat but very, very few actual pictures of my boat. The wide angle lens is one reason I am looking to upgrade some gear.
If we ever meet up will spend the day photographing each other and share…now that’s a good reason for buddy boating 🙂